claudenancy
New Member
- Joined
- Jul 2, 2008
- Messages
- 246
I am posting a description below. I do not know how clear it is. I will add some labeled photographs and answer any questions after we return from a cruise. We are leaving soon, so I must go pack--I've put that off as long as I can. (Hate packing)
Here goes:
Materials:
1. BASE:
nylon coated beading wire. I had several diameters on hand because I had to test the holes of the beads to determine tolerance. I ended up using (in inches) .010 and .012. I tried at first to use the .012 for both strands, but discovered that at least one strand had to be .010 because the little diamonds had such small holes.
Because of use of the very hard stones in this necklace it was really not feasible to use silk or similar options. I wanted to use the .012 because I was able to find accuflex in that width. Other brands with the 49 strand option start at .013, which was too tight for the sapphire holes. Sounds like a small difference but the .012 was fine for all, but the .013 would not work with a few beads. (I discovered that I needed to test a fairly large sample of beads before starting to make sure I had enough beads that I could actually string.)
In the necklace the wire has to go through any sapphire bead once, but both wires have to pass through each of the four side pearls, and one of the wires has to pass through the diamond bead holes once and the central pearl twice. In this necklace the .010 wire, which I could obtain only in 19 or 21 strands, was used to pass through the diamond and the central drop pearl.
I used two strands of the nylon covered wire. The total length of my necklace (hooked ) is 15.5 inches, and I made a two inch extender.
I am sure that experienced beaders already know this but I have discovered the hard way that it is good to be generous with the cut. I cut the wires about 1/3 longer than the planned length, and cut the wire that was used for the drop about 1 to 2 inches longer.
Because so much is done on the wires, and two wires are used in a coordinated fashion, I will in the future use something to hold the unworked side together such as a beadwire holder.
2. WIRE . In the central section I wanted to add a third top strand of sapphires. I used 18k gold 28 guage half hard wire—I believe I cut about 6 inches for this section. It spans about 2.5 inches, but had to be slightly curved and wrapped on each side around the beading wires (more about this below)..
This wire was used to add to the central section of the necklace a third strand of sapphires. The sapphires are “strung” on 18k gold wire to form a thicker strand and to allow the larger sapphires to cluster around the central pearl.
3. SAPPHIRES: approx. 280 small sapphire faceted briolettes (these varied from about 3.5 to 5 mm in length); 7 larger sapphire briolettes
4. DIAMONDS: 2 diamond faceted beads (fat briolettes)
5. GOLD BEADS: 10 gold beads (mine were about 5,5 mm, and had a stringing hole of approximately 2mm); 6 3 to 3.5 mm barrel beads (relatively large hole); approximately 20 2mm, round gold beads with large hole (these are important and I try to have a selection of 2 to 3mm large hole beads to “test” for hole size—also good to have a few extra because they are easily crushed or dropped!!!); I also used 4 slightly larger barrel beads toward the clasp. I used 2mm crimp beads as well. I used on the bottom of the drop pearl a small round bead with somewhat of a barrel shape—it is probably about 2-3 mm. The barrel shape was good for connecting the diamond drop to the pearl.
I also used small gold spacers on the top of the drop pearl, and around the flanking pearls, however, I ran out of spacers, and being somewhat impatient, did not wait for more—so did not use them around the two end pearls. However, I made sure that the gold beads touching the pearls had a smooth, blunt edge there.
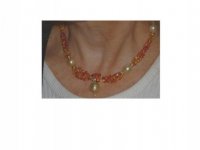
6. PEARLS: I used 4 near round (9.5 to 10 mm) and one ringed drop (about 12.5 mm). The necklace would have been easier to make if I had strung the central pearl in line and not created a drop, so if I repeat this design I will consider using a fifth pearl that would work in line rather than as a drop.
7. Clasp, I used a hook clasp.
As a preface I will give you a simple rule of thumb for calculating the number of sapphires that you need to make the “chain” that you see connecting the two upper pearls on each side, and then connecting the end pearls to the gold beads that lead to the clasp. You will need 24-26 per inch (12-13 on each parallel strand). The “chain between the pearls is about 2 inches in length.
How I made the necklace:
Central part
1. The pearl drop:
Starting in the center on the wire that would pass through the central drop pearl twice and the diamond once, I put the diamond briolette dangle (that sits below the pearl) on the wire.
I center the diamond and brought each side of the wire through the small barrel bead so that the briolette was dangling on the center of the wire with the barrel bead holding it as a drop,
I then passed both sides of the wire through the central pearl (the barrel bead anchors the wire so that it is not chaffing the sides of the pearl hole).
Where the wire ends emerge on the top of the pearl, I placed e a spacer so that both ends of the wire also pass through the spacer.
2. I then strung the central section of the lower wire with the drop .
I place one of the small barrel beads followed by a 2mm round bead on each side of the wire where the wire emerged from the spacer. It is at this point that thehe wire must bend at an angle greater than 90 degrees between the spacer and the barrel bead to transition from the vertical drop section back to the strand . I had to experiment to see what configuration of beads best permitted flexibility of angle but also covered the wire best.
I then passed the wire through one of the larger beads (for me the 5.5 mm beads with the 2mm hole) on each side so that the 2mm bead was sitting next to the larger bead. (At this point I had to be very careful to make sure that the little bead did not get “swallowed” by the larger bead—it can happen!!]
After the larger bead I strung 12 or 13 of the smaller sapphire briolettes onto the wire
Note: in the next step I added the second wire and completing the central section of that wire—here it would have been a good idea to have either beadwire holders or hemostats to anchor the wires and the completed section of the lower wire. I did not do this and it was a XXXXXX!!!!!!
3. Completing the central section of the second wire—
This contains some of the beads that are above the drop.
My center bead on this wire was the second diamond bead
On either side I added two of the larger sapphire briolettes, so the second wire contains four sapphire briolettes and the central diamond bead that sits just above the drop.
Then on each side I passed the second wire through the larger bead that was already strung on the first wire—this is the first connection for the two wires.
Following the larger gold bead, I strung 12 or 13 of the smaller sapphire briolettes on the second wire. At this point there were two parallel strings of smaller briolettes strung after each of those larger gold beads.
I pulled wires firmly (but not too tight)—so they began to naturally twist slightly together with no visible gaps. (This actually took some practice, but became easier as I got the “feel” of it.) The trick was securing them while I worked on the other side . I finally used a clip to hold them while I worked on the opposite side, but I definitely in the market for something that works better here!
4. Third strand: I then added the gold wire to the central section—this added a third line of sapphires to the central necklace.
Beginning in the center of the gold wire I strung the remaining three larger sapphires, separating each with a 2 mm bead an alternating sapphire, bead, sapphire, bead, sapphire. I discovered that I needed the beads as filler as I curved the wire slightly over the lower sections.
On each side, I then ran the end of the gold wire through the larger bead that was already strung on the lower strands.
On each side, I then strung 12-13 of the smaller sapphire briolettes on the gold wire. These also gently curved over the parallel sections of small sapphires on the lower wires.
I had to work with these strands again so that everything was aligned. Again, hemostats would have been a great help here.
On each side I wrapped the gold wire several times around the beading wires at the end of the sapphires on the lower two wires. I had to be careful not pull the gold wire so tightly that there was stress on the wire. I wanted the wrap to be secure but not so tight that it cut the nylon coating. I clipped excess wire and tucked the end.
On each side, I strung another larger bead (I used the 5.5 mm with the 2mm hole) over both beading wires and pulled gently until it covered the wrap. I worked with it until the bead fit snugly and completely covered the wrapped section.
At this point, I had to go back and make adjustments so that the three strands were in proper positions with no obvious gaps—not too tight, not too loose. Very time consuming.
Here goes:
Materials:
1. BASE:
nylon coated beading wire. I had several diameters on hand because I had to test the holes of the beads to determine tolerance. I ended up using (in inches) .010 and .012. I tried at first to use the .012 for both strands, but discovered that at least one strand had to be .010 because the little diamonds had such small holes.
Because of use of the very hard stones in this necklace it was really not feasible to use silk or similar options. I wanted to use the .012 because I was able to find accuflex in that width. Other brands with the 49 strand option start at .013, which was too tight for the sapphire holes. Sounds like a small difference but the .012 was fine for all, but the .013 would not work with a few beads. (I discovered that I needed to test a fairly large sample of beads before starting to make sure I had enough beads that I could actually string.)
In the necklace the wire has to go through any sapphire bead once, but both wires have to pass through each of the four side pearls, and one of the wires has to pass through the diamond bead holes once and the central pearl twice. In this necklace the .010 wire, which I could obtain only in 19 or 21 strands, was used to pass through the diamond and the central drop pearl.
I used two strands of the nylon covered wire. The total length of my necklace (hooked ) is 15.5 inches, and I made a two inch extender.
I am sure that experienced beaders already know this but I have discovered the hard way that it is good to be generous with the cut. I cut the wires about 1/3 longer than the planned length, and cut the wire that was used for the drop about 1 to 2 inches longer.
Because so much is done on the wires, and two wires are used in a coordinated fashion, I will in the future use something to hold the unworked side together such as a beadwire holder.
2. WIRE . In the central section I wanted to add a third top strand of sapphires. I used 18k gold 28 guage half hard wire—I believe I cut about 6 inches for this section. It spans about 2.5 inches, but had to be slightly curved and wrapped on each side around the beading wires (more about this below)..
This wire was used to add to the central section of the necklace a third strand of sapphires. The sapphires are “strung” on 18k gold wire to form a thicker strand and to allow the larger sapphires to cluster around the central pearl.
3. SAPPHIRES: approx. 280 small sapphire faceted briolettes (these varied from about 3.5 to 5 mm in length); 7 larger sapphire briolettes
4. DIAMONDS: 2 diamond faceted beads (fat briolettes)
5. GOLD BEADS: 10 gold beads (mine were about 5,5 mm, and had a stringing hole of approximately 2mm); 6 3 to 3.5 mm barrel beads (relatively large hole); approximately 20 2mm, round gold beads with large hole (these are important and I try to have a selection of 2 to 3mm large hole beads to “test” for hole size—also good to have a few extra because they are easily crushed or dropped!!!); I also used 4 slightly larger barrel beads toward the clasp. I used 2mm crimp beads as well. I used on the bottom of the drop pearl a small round bead with somewhat of a barrel shape—it is probably about 2-3 mm. The barrel shape was good for connecting the diamond drop to the pearl.
I also used small gold spacers on the top of the drop pearl, and around the flanking pearls, however, I ran out of spacers, and being somewhat impatient, did not wait for more—so did not use them around the two end pearls. However, I made sure that the gold beads touching the pearls had a smooth, blunt edge there.
6. PEARLS: I used 4 near round (9.5 to 10 mm) and one ringed drop (about 12.5 mm). The necklace would have been easier to make if I had strung the central pearl in line and not created a drop, so if I repeat this design I will consider using a fifth pearl that would work in line rather than as a drop.
7. Clasp, I used a hook clasp.
As a preface I will give you a simple rule of thumb for calculating the number of sapphires that you need to make the “chain” that you see connecting the two upper pearls on each side, and then connecting the end pearls to the gold beads that lead to the clasp. You will need 24-26 per inch (12-13 on each parallel strand). The “chain between the pearls is about 2 inches in length.
How I made the necklace:
Central part
1. The pearl drop:
Starting in the center on the wire that would pass through the central drop pearl twice and the diamond once, I put the diamond briolette dangle (that sits below the pearl) on the wire.
I center the diamond and brought each side of the wire through the small barrel bead so that the briolette was dangling on the center of the wire with the barrel bead holding it as a drop,
I then passed both sides of the wire through the central pearl (the barrel bead anchors the wire so that it is not chaffing the sides of the pearl hole).
Where the wire ends emerge on the top of the pearl, I placed e a spacer so that both ends of the wire also pass through the spacer.
2. I then strung the central section of the lower wire with the drop .
I place one of the small barrel beads followed by a 2mm round bead on each side of the wire where the wire emerged from the spacer. It is at this point that thehe wire must bend at an angle greater than 90 degrees between the spacer and the barrel bead to transition from the vertical drop section back to the strand . I had to experiment to see what configuration of beads best permitted flexibility of angle but also covered the wire best.
I then passed the wire through one of the larger beads (for me the 5.5 mm beads with the 2mm hole) on each side so that the 2mm bead was sitting next to the larger bead. (At this point I had to be very careful to make sure that the little bead did not get “swallowed” by the larger bead—it can happen!!]
After the larger bead I strung 12 or 13 of the smaller sapphire briolettes onto the wire
Note: in the next step I added the second wire and completing the central section of that wire—here it would have been a good idea to have either beadwire holders or hemostats to anchor the wires and the completed section of the lower wire. I did not do this and it was a XXXXXX!!!!!!
3. Completing the central section of the second wire—
This contains some of the beads that are above the drop.
My center bead on this wire was the second diamond bead
On either side I added two of the larger sapphire briolettes, so the second wire contains four sapphire briolettes and the central diamond bead that sits just above the drop.
Then on each side I passed the second wire through the larger bead that was already strung on the first wire—this is the first connection for the two wires.
Following the larger gold bead, I strung 12 or 13 of the smaller sapphire briolettes on the second wire. At this point there were two parallel strings of smaller briolettes strung after each of those larger gold beads.
I pulled wires firmly (but not too tight)—so they began to naturally twist slightly together with no visible gaps. (This actually took some practice, but became easier as I got the “feel” of it.) The trick was securing them while I worked on the other side . I finally used a clip to hold them while I worked on the opposite side, but I definitely in the market for something that works better here!
4. Third strand: I then added the gold wire to the central section—this added a third line of sapphires to the central necklace.
Beginning in the center of the gold wire I strung the remaining three larger sapphires, separating each with a 2 mm bead an alternating sapphire, bead, sapphire, bead, sapphire. I discovered that I needed the beads as filler as I curved the wire slightly over the lower sections.
On each side, I then ran the end of the gold wire through the larger bead that was already strung on the lower strands.
On each side, I then strung 12-13 of the smaller sapphire briolettes on the gold wire. These also gently curved over the parallel sections of small sapphires on the lower wires.
I had to work with these strands again so that everything was aligned. Again, hemostats would have been a great help here.
On each side I wrapped the gold wire several times around the beading wires at the end of the sapphires on the lower two wires. I had to be careful not pull the gold wire so tightly that there was stress on the wire. I wanted the wrap to be secure but not so tight that it cut the nylon coating. I clipped excess wire and tucked the end.
On each side, I strung another larger bead (I used the 5.5 mm with the 2mm hole) over both beading wires and pulled gently until it covered the wrap. I worked with it until the bead fit snugly and completely covered the wrapped section.
At this point, I had to go back and make adjustments so that the three strands were in proper positions with no obvious gaps—not too tight, not too loose. Very time consuming.
Last edited:

")
")