You are using an out of date browser. It may not display this or other websites correctly.
You should upgrade or use an alternative browser.
You should upgrade or use an alternative browser.
Stringing Tutorial with photos: Stringing on Serafil, Beaders Secret & Power Pro
- Thread starter Pearl Dreams
- Start date
GemGeek
Pearlista
Wow -- EXCELLENT JOB! Great photos. This should be "sticky-ed" so we can find it easily. ")
Amrita
Member
Please pass on our thanks to your daughter, Pearl Dreams, for patiently taking such excellent photos!
Sarah
Member
Wow -- EXCELLENT JOB! Great photos. This should be "sticky-ed" so we can find it easily.
Ditto to that! I've read the written instructions on this from another thread and somewhat understood it after reading over and over and carefully visualizing. This is so much better! Love, love, love all the photos and special tips and instructions.
Pearl Dreams
Pearl Enthusiast
Thanks, everyone! I have thanked my daughter but will tell her again!
Visualizing it was always the hardest part for me. Once I was able to do that, the rest was just a matter of mechanics and motor memory.
*If there are any procedures or steps that aren't pictured here but would be helpful, I could stage easily a shot of them using some other loose pearls I have on hand-- just ask.
Caitlin
Well-known member
As the author of one thread on this, I agree, this one is clear and concise. I will stick it right now.
Happy Huku
Well-known member
Any questions?
By the way, the reason I restrung this necklace is that I originally had it strung with a huge, oval, gold with diamonds clasp (not realizing how disproportionately large it would be for the 7-8mm Freshadamas), and I wanted to swap that clasp with the ball clasp that came with my color-shifting drops!
Here are the color-shifting drops (also restrung on PowerPro) with the oval clasp that used to be on the Freshadamas, and the Freshadamas with the ball clasp that used to be on the oval drops; both are improved by the swapping of clasps:
Thank you for a great tutorial, I'm saving it for one day when... I might have the time to try my own re-stringing.
Also, your lovely pearls confirm what I feel about clasps, they are not always right for the pearls they are on and can be improved.
Pearls are so visual and tactile, aren't they.
Pearl Dreams
Pearl Enthusiast
...
Also, your lovely pearls confirm what I feel about clasps, they are not always right for the pearls they are on and can be improved.
Pearls are so visual and tactile, aren't they.
I agree about the clasps! I like my clasps to suit the strand if possible, especially since the clasp may slide around to the front of the neck over the course of the day.
Pearl Dreams
Pearl Enthusiast
An unexpected benefit of restringing my Freshadamas on Power Pro is that I am wearing them more in damp weather now.
Yesterday it was drizzling, and normally I don't wear pearls out in the rain-- what if the silk gets wet? But with the PowerPro I didn't care and wore them anyway while running errands.
Edit: Same goes for Serafil / Beaders Secret-- it can take being wet.
Yesterday it was drizzling, and normally I don't wear pearls out in the rain-- what if the silk gets wet? But with the PowerPro I didn't care and wore them anyway while running errands.
Edit: Same goes for Serafil / Beaders Secret-- it can take being wet.
Caitlin
Well-known member
That's the first time I've heard that, but of course it makes sense! If you live somewhere where it rains, that is. In AZ, not so much.
Pearl Dreams
Pearl Enthusiast
I've been busily restringing other strands-- a bracelet of small multicolors, smaller and a larger oval strands from the 2008 private offer, and today I got half-way through stringing a rope of 180 smallish multicolored pearls (lots of flaws on these but they are good enough for the purpose.) It should be 48" long when done.
This rope has shown me that I need to post a variation on the knotting instructions for making long strands-- the technique I am using is that of dropping the pearls through the overhand knot. This is the only way to avoid tangling the long, long thread. Sometime this weekend I'll grab my daughter to take a few more photos to demonstrate this.
Basically the idea is this:
Every thread you are knotting has 2 ends-- the end with the needle and the end with the clasp. Either end can be passed through the loop to form the overhand knot.
For an 18" strand, it's easy to pass the needle end of the thread through the overhand knot loop-- it goes in at the back of the loose knot and is pulled through the front, as in the photos.
But when the thread is very long, this is a recipe for tangles.
Instead, I made the overhand knot loop as usual over the fingers of my left hand, transferred the loose knot to the fingers of my right hand and held it open horizontally with spread fingers, then gently dropped the already-strung pearls + clasp down through the loose, open knot. Once the pearls were through, I transferred the loose knot back to the fingers of my left hand. I then used an awl to guide the knot into position (not strictly necessary but I like to do this) and then pulled the two threads apart to seat and tighten the knot.
Edit: I have taken to doing this even for short strands. It is faster than stringing on one pearl at a time.
A picture is worth a thousand words, so photos will be coming.
Edit: See post 34 and following.
Last edited:
LLoydsJewelry
Member
Great tutorial,
I use very similar technique, but leave out the tweezers. This is called the Japanese method by some. You can also as a option (works expecially for placing mulitcolors) put all your beads on one strand before doing the starting bail. Using a bead keeper of some sort to keep them from coming off. After gimp and getting started, just slide each bead up the one strand, do an overhand knot with the other strand. I might should call this my armchair method. You can sit in a comfortable chair and do this, as I have. Pull the power pro in two directions after getting the loop close to the pearl (I use my fingernail to guide the knot up close). Like the first step in tying a shoe. The knot will go in place, and be properly tight with no gap.
Remember that with power pro's great strength, resistance to abrasion (this stuf is used to make bullet proof vests), larger lb test, or doubling is needed to increase diameter, not for higher strength. It will be plenty strong in lesser strands. Be sure to test for knot size working properly before getting started.
Llolyd
Gemologist GIA Certified
http://www.etsy.com/shop/LloydsJewelry?ref=pr_shop
As an option to using doubled thread, you can get power pro from fishing suppliers in larger diameter. I use 20lb mostly, but 50 lb test when I have larger holes.
Pearl Dreams
Pearl Enthusiast
Thank you, Lloyd!
I've finally done the added tutorial photos showing how to knot a very long strand. (Edit 10/3/16: Nowadays I do all my strands this way, even the short ones. It's faster and I get fewer thread tangles.)
Every thread has two ends-- the end with the clasp + pearls and the end with the needle.
In the technique I taught above for normal length strands, the needle end of the thread is passed through the back side of the loop to form a knot.
That is fine for relatively short necklaces, but when making very long strands, this would mean wrangling with an extremely long thread. And that is not only very awkward but it greatly increases the risk of making unwanted tangles.
So instead, we will pass the clasp + pearls end of the thread through the loop from the front (except I will be rotating the loop 90 degrees so that the pearls are dropped down into the loop-- it is easier to let gravity help you.)
*If you are wondering why there is no clasp on the pearls in the photos below, it's because it was not a real strand that I was making-- it's just a few fake pearls strung and knotted onto the thread for the purpose of the tutorial.
Excuse my dry hands!
My daughter took the photos.
Last edited:
Pearl Dreams
Pearl Enthusiast
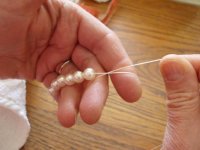
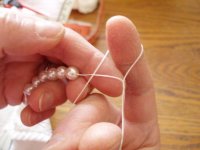
1. Start the overhand knot as usual.
2. Pinch where the threads overlap.
3. Insert fingers of right hand through loop as shown.
2. Pinch where the threads overlap.
3. Insert fingers of right hand through loop as shown.
Attachments

Pearl Dreams
Pearl Enthusiast
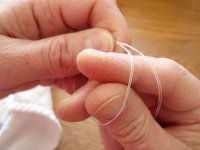
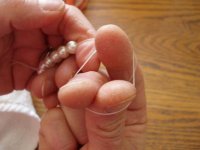
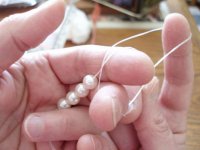
4. Rotate right hand so loop is horizontal.
5. Drop already-knotted part of strand down through the open loop (when beginning this will be just the clasp and the first pearl.)
6. Transfer the pearls back to the left hand.
5. Drop already-knotted part of strand down through the open loop (when beginning this will be just the clasp and the first pearl.)
6. Transfer the pearls back to the left hand.
Attachments
Pearl Dreams
Pearl Enthusiast
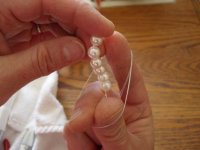
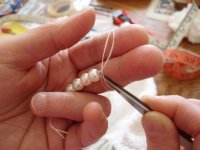
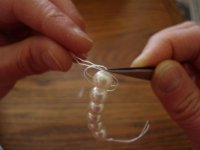
7. Transfer the loop back to the fingers of the left hand (continued).
8. If using tweezers, insert the tweezers through the loop to grasp the threads just above the pearl.
If using an awl or darning needle to guide the knot to the right place before tightening, do this now.
9. Pull the two threads apart to seat and tighten the knot as usual.
Then slide over the next pearl and repeat the process.
Attachments
Last edited:
Pearl Dreams
Pearl Enthusiast
I've experimented with doing this without all the passing back and forth of the loop from hand to hand but it didn't work for me.
(If you prefer to keep the loop on one hand, which is what is demonstrated in this video from Pearl Paradise, by all means try it! Instead of dropping the pearls down through the knot loop, in this method you have to push them upward through the knot loop.
"Pearl Stringing from PearlParadise.com" -- YouTube
)
Even so, I got the rhythm of this pretty quickly.
Also-- You can string all your pearls onto the thread initially and just slide one over at a time to knot, as LloydsJewelry pointed out, or you can string on 6-10 pearls at a time. I have found that the threads begin to twist near the needle, and it is easier to remedy that-- to gently separate the threads all the way out to the needle-- if I string on fewer pearls at a time. So now I string on 6-10 pearls, knot them, take a moment to separate/untwist the doubled threads all the way out to the needle, then string on more pearls, and carry on.
I like to put a spring type bead stopper on the thread near the needle --to make sure the pearls don't slide back off the needle!
(If you prefer to keep the loop on one hand, which is what is demonstrated in this video from Pearl Paradise, by all means try it! Instead of dropping the pearls down through the knot loop, in this method you have to push them upward through the knot loop.
"Pearl Stringing from PearlParadise.com" -- YouTube
Even so, I got the rhythm of this pretty quickly.
Also-- You can string all your pearls onto the thread initially and just slide one over at a time to knot, as LloydsJewelry pointed out, or you can string on 6-10 pearls at a time. I have found that the threads begin to twist near the needle, and it is easier to remedy that-- to gently separate the threads all the way out to the needle-- if I string on fewer pearls at a time. So now I string on 6-10 pearls, knot them, take a moment to separate/untwist the doubled threads all the way out to the needle, then string on more pearls, and carry on.
I like to put a spring type bead stopper on the thread near the needle --to make sure the pearls don't slide back off the needle!
Ramona
Member
- Joined
- Sep 2, 2008
- Messages
- 471
Thanks for the tutorial. I finally finished some of my necklaces. I just wondered what is best to finish off at the end when you do not have pearls, but gemstones, which do not allow to double pass the thread. Do people then glue the knot or zap it? What is the most stable?
Pearl Dreams
Pearl Enthusiast
You may wish to try these bead tips-- they have closed loops and you can attach a clasp to them with a jump ring:
https://www.riogrande.com/Product/14-20-Gold-Filled-Double-Cup-Bead-Tip/689195
I haven't tried them yet, but I recall reading a post by GemGeek who said she used this type of bead tip. I would make a knot and apply a dab of glue over it before closing the clamshell over the knot.
Personally I've mostly strung my gemstones on nylon-coated beading wire and used Twisted Tornado crimps. In cases where the end beads' holes were too narrow to double back after the crimp, I would string a round metal (silver or gold-filled) bead or a small round garnet or horn bead (with a large-enough hole diameter) as the last bead next to the clasp.
You could take a chance on reaming out the end beads' holes using a small battery powered drill (with the bead under water to cool and lubricate the drill bit) but you run the risk of breaking the bead.
Edit to add that Twisted Tornado crimps must be flattened with a regular pair of flat pliers. Do not use a crimping tool with them-- it won't secure the wire.
Edit again: Lately I have enjoyed using Beadalon "Scrimps"/ Screw-tite crimps (see links below). These are small beads with a screw in the side that can be loosened and tightened. You loosen the screw, pass the wire through the scrimp, then through the clasp, then back through the scrimp-- then you tighten the screw using a tiny screwdriver to secure the wire. They are reusable-- or you can add a drop of glue before tightening the screw, to secure them permanently. You can buy the tiny screwdriver with the scrimps or use eyeglass-adjusting screwdrivers.
Scrimps: https://www.beadalon.com/products/parent_scrimp_findings.asp
Scrimps are also sold on Amazon: https://www.amazon.com/s?k=beadalon...efix=beadalon+scrimps,aps,62&ref=nb_sb_noss_1
Screw-tite crimps: https://www.firemountaingems.com/search?keywords=screw+crimps
Similar threads
- Replies
- 8
- Views
- 3K
- Replies
- 11
- Views
- 3K
- Replies
- 7
- Views
- 6K