Stringing Tutorial with photos: Stringing on Serafil, Beaders Secret & Power Pro

Pearl Dreams

Pearl Enthusiast
Joined
Sep 24, 2007
Messages
9,527
How to string (or restring) your pearls on doubled Pattye's Serafil, Beaders Secret, and Power Pro

This is not hard-- really! It is harder to describe it than to do it. Anyone can learn to string their own pearls!
If after reading through this, it sounds too daunting, I suggest making a mini-strand for practice first. Make one 12-15 pearls long just so you can practice how to knot the end 3 pearls on each side and attach the clasps; the middle pearls are easy to knot.

To just practice knotting (without bothering with clasps), make an overhand knot, string on a pearl (or any bead), and keep on knotting and adding pearls until you feel comfortable with your knotting technique. Then cut the pearls or beads apart to reuse them.


If you don't understand anything here, please post, or message me.
I can always add more photos if any step is still unclear.


Which thread to use
You can use silk or another thread if you prefer, but I am going to recommend synthetic threads, specifically Pattye's Serafil, Beaders Secret and Power Pro.
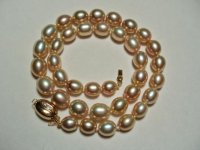
*Edit: See pages 4 & 5 where I tested Pattye's Serafil and Beaders Secret, sold on Etsy; particularly recommended for colored pearls when you want matching thread. Also recommended if you do not want to use tweezers to seat the knot correctly-- this thread is slippery and the knot glides into place when the 2 threads are pulled apart.


Why Pattye's Serafil, Beaders Secret or Power Pro instead of silk? Power Pro, Pattye's Serafil and Beaders Secret don't stretch out and stay cleaner than silk (but can be washed or worn in the shower.) They are strong and durable, make tight, elegant knots and don't twist and tangle while you are working with them, as twisted silk thread does. You can sometimes even unpick an accidental knot, which is nearly impossible with silk.

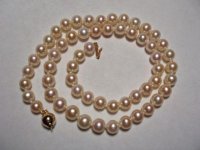
Pattye's Serafil and Beaders Secret come in many colorfast colors. Colors of Power Pro are limited, however. Use Moss Green for black or dark pearls and White for other color pearls.
If you need to use very fine white thread, Power Pro 10# test is very strong and preferable to silk. I have had fine silk break when tugging the doubled threads apart to seat the knot, whereas 10# (thin) Power Pro won't break when tugged firmly. The finest size of Serafil is also good for very small pearls.

_________________________________________________​


Abbreviated Instructions-- to show you it is not really so complicated!

I will expand on these instruction in the tutorial below; after you have made your first strand, this abbreviated version may be all you need to remind you what to do the next time.


1. Cut a length of thread 5 times the anticipated final length of the knotted strand.
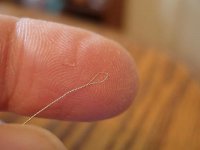
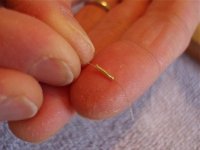
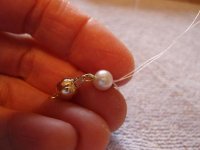
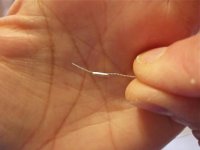
2. Thread the needle, double the thread and make a large knot, then string on the first 4 pearls in reverse order.
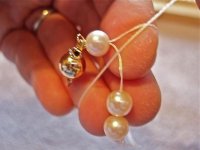
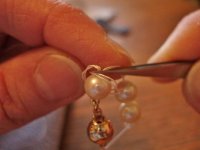
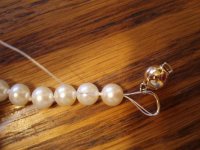
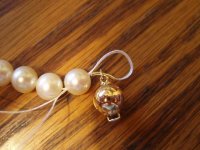
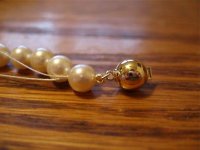
3. String on a bit of gimp, then pass the needle through the clasp and back through the end pearl. Snug up the thread + gimp + clasp carefully.
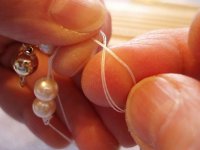
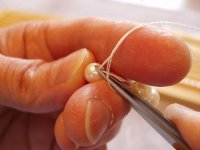
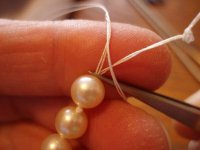
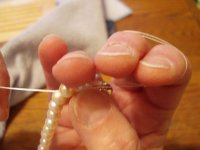
4. Make an overhand knot with the thread around the existing thread between the end pearl and the next pearl.
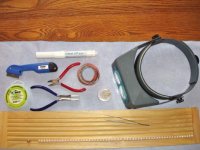
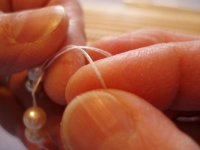
5. Use a pair of pointy tweezers (or an awl or darning needle) to guide the knot next to the pearl. To seat the knot, pull the two threads apart firmly. EDIT: Tweezers are not necessary when using Serafil / Beaders Secret thread. The knot slides into place when the two threads are separated firmly.
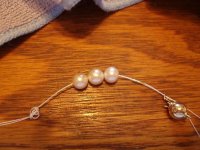
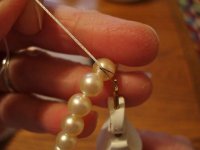
6. Pass the needle through the next pearl, knot, then the 3rd pearl and knot.
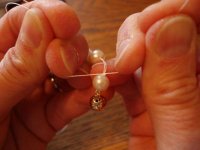
7. Pass the needle through the 4th pearl but do not make a knot yet. Trim off the original knot close to the pearl.
8. Now make a knot after the 4th pearl. Keep going, knotting between each pearl until you get to the last 4 pearls from the other end-- just pass the needle through all 4 of them without knotting.
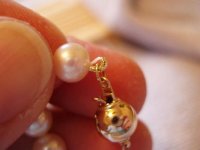
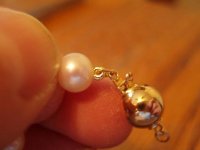
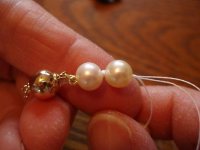
9. String on gimp, then the other end of the clasp, then pass the needle back through the end pearl. Snug up the thread.
10. Knot between the end pearl and second pearl. Pass the needle back through the 2nd pearl from the end, make a knot, then repeat with the 3rd pearl, knot.
11. Pass the needle one more time through the 4th pearl, but do not make a knot. Just trim thread close to the pearl. The trimmed-off tail will thus be concealed inside the 4th pearl, for a neat look.

5/30/22 I updated the links. They seem to have been broken when PG changed platform.
If I see any other other links that are broken, I'll update them.

For knotting an "endless" strand (without a clasp) see post #42, on page 3 of this thread.


To string on all the pearls at once, and then knot in between (this is the way I do it nowadays) see post #31.

For knotting a strand with thread and silicone bead bumpers (it's quicker-- fewer knots!) see post #153:

Edit: I'm adding a link to LloydJewelry's YouTube video entitled:

How to Hand tie a Pearl necklace no tools Japanese Method​

 
Materials-- what you need, and some other items you may choose to use (none of these is expensive):


1. Thread Suggestions

To test for the right thickness
, string a short length of thread onto a fine wire needle and double it, then pass it twice through the end 4 pearls on both sides of the necklace. If it does not pass through twice, use a thinner size thread, or use different pearls for the end three-- find pearls with larger drill holes.
Edit: Recently I used mini broaches (like these on Amazon-- Modelcraft 0.6-2.0 mm Cutting Broach Set) to ream out the end pearls. When you twirl them they shave down the interior of the drill hole.)

Now make an overhand knot and tighten it by pulling the 2 ends apart. If the knot slips into the pearl hole, it's too fine; use a thicker size thread.
• Pattye's Serafil or Beaders Secret (highly recommended for beginners, see the two Etsy stores in links below), a strong, non-stretching polyester thread that comes in a variety of colors, is about the thickness of 20# Power Pro and is 12# test strength. If you need to make a thicker knot you can make a Jeweler's knot which is where you pass the needle through the knot loop one additional time before tightening it. (But note: I find I need tweezers to ensure this "Jeweler's knot" ends up in the right spot.)
Edit: Pattye's Serafil or Beaders Secret is now available in limited colors in a thicker thread, and also in a finer thread.

(There's a separate discussion on threads, with more information on Pattye's Serafil or Beaders Secret threads:

• Power Pro-- Beadsmith Power Pro comes on a spool and is sold online as a beading material. You may also find Power Pro sold as fishing line in the sporting goods section of your local store (but our WalMart only carries the Moss Green color.) Also check out Pattye's Etsy shop for Power Pro. This thread comes in 10#, 20# and 30# sizes, also 50# and 65#. The numbers refer to how many pounds of tugging the thread can take without breaking. Doubled thread means double the strength!

20# is probably the most useful all-around. I've used 20# for my 7mm to 11.5mm pearls. 10# is good for very small pearls with fine holes -- I used it to restring my 3.5 momme graduated akoya strand with the tiny pearls on the end. 30# and larger would be good for larger, heavy pearls or pearls with large drill holes.

Stringth-- I have recently tested #3 Stringth and found it to be too heavy, rough and stiff for pearl knotting. Colors are also more limited than Pattye's Serafil or Beaders Secret.

2. Twisted (flexible) wire needle, or other flexible wire large-eye needles-- Needles come in different thicknesses. Choose a size that will pass through your end pearl drill holes twice with doubled thread. (I use the Fine size usually, but the Medium size for pearls with larger holes.)
The eye collapses as you use it, to pass through the drill hole. However, to reuse the needle, just open up its eye again with a needle or an awl.
When a needle becomes bent, straighten it by passing it through a pair of nylon-head pliers (great inexpensive tool to have on hand for straightening wire!)
If the needle tip becomes frayed, trim it with wire cutters.
Thin wire needles are practically invisible when not threaded-- if you drop one, you may need a light to locate it! ;)


3. Wire cutters, for cutting pieces of gimp and trimming wire needles as needed. Cuticle trimmers work for this also. You can get very inexpensive wire cutters at craft stores, but if you can afford better ones, Rio Grande has some great cutters. This is a good item to splurge on, IMO.

These are the ones I have; I have begun using them to cut apart necklaces before restringing. they work very well for this, and for cutting gimp:
https://www.riogrande.com/product/swanstrom-double-ergo-super-flush-cutters-size-4/111712


4. Clasp with a loop on each side, through which your thread and gimp must be able to pass. (If the hole is too small, attach an open type jump ring to the clasp, close it with pliers, and string your thread + gimp through that.)


5. Gimp (also known as French Wire or bullion). This is a slender coil of wire that is strung on like a bead just before attaching the clasp, and serves the purpose of protecting the thread near the clasp. When pulled snug, the little coils overlap and are like armor over the thread. Although you can skip using it, your stringing job will look more professional if finished with gimp. It comes in different thicknesses. Use a size wide enough that your needle and doubled thread can pass through it, but slender enough to pass through the rings of the clasp. Cut it into desired pieces using wire cutters.

For 10# and 20# PowerPro or fine or medium Pattye's Serafil or Beaders Secret with "Fine" size wire needles, I recommend "Fine" or .8mm gimp. Fire Mountain Gems sells vermeil and sterling silver gimp (and other types and colors too.) I have tried both vermeil and sterling silver and like them better than the gimp I previously bought from Artbeads.

I used to use Medium size but I found that the Fine gimp is wide enough for doubled Pattye's Serafil / Beaders Secret to pass through (even the Heavy size Pattye's Serafil or Beaders Secret), and makes a smaller, tighter and less obtrusive gimp loop.


6. Thread Zap (battery-operated, has a heated filament that cuts through the thread cleanly without leaving residue, and melts the ends of twisted threads like Pattye's Serafil or Beaders Secret so they don't fray; Michael's carries it, or see Amazon). (Note: Don't use Thread Zap on silk-- it will leave a charred thread end.)

Other ways to cut the thread (but may leave frayed ends):
• a craft knife-- basically a razor in a handle (I like the retractable razor knife kind that is segmented. When the end segment gets dull, you break it off with strong pliers and advance the next segment.) I use this to cut my lengths of thread at the start. Power Pro does not fray when cut this way.
• sharp scissors
wire cutters, if very sharp
Note: Power Pro is harder to cut than other threads.


7. Pointy tweezers or an awl or a darning needle to guide the knot to the right place before tightening it.
These tweezers sometimes have sharp edges that cut through silk, so if you use silk thread, use a file to smooth the edges a bit before using them to knot.

Even if you don't use tweezers for knotting, it's good to have them on hand.
• Tweezers can help you undo an unintended knot if it isn't too tight yet-- insert the points and let them spring apart gently to loosen the knot further until it's loose enough that you can untangle it with your fingers.
• Also, when finishing the necklace, back-knotting the last 3 pearls can be tight, and tweezers help you grasp the needle as it emerges from the pearl to help pull it through. Pliers can also be used to grasp the needle, but in a very tight space I prefer tweezers.
Note: Tweezers are not necessary for knotting when using Pattye's Serafil or Beaders Secret thread. It is slippery enough that the knot slides into position when the the threads are separated firmly.

Edit 8/25/15: Today I knotted a necklace with Power Pro using only an awl (no tweezers) to guide the loose knot into position before tightening it by pulling the two threads apart. This works fine.

8. A working surface that will keep your pearls from rolling around. Beading board, towel, whatever works for you. I like to compose my strand on a beading board but then knot it on a clean towel.


9. A tape measure, if your beading board isn't marked in inches. I also use a tape measure to measure my thread.


10. Optional: A magnifier for close work, if your eyes are like mine! I like the kind I wear on my forehead. This is the most expensive item on my list.
I use the Donegan OptiVISOR with 3.5x lens: http://www.riogrande.com/Product/Donegan-OptiVISOR-with-35X-Lens/113199

11. Optional (not pictured): Cement, if you prefer to add a dab to your final knots. I generally do not, but the few times I have used it, I used G-S Hypo Cement, which comes in a small tube with a long thin needle-like applicator. If you make 3 knots on each end of your strand you don' t really need cement. I did add a dab when finishing my endless Tahitian necklace, though. A bit of extra security.

Here is an article an different glues and cements and what they are good for:
http://www.alacarteclasps.com/pdf/gluing-instructions.pdf

Some sources for materials:

Polyester thread, gimp, wire needles etc:
https://www.etsy.com/shop/PatriciaS...cret&order=date_desc&view_type=gallery&page=1
and
https://www.etsy.com/shop/BeadersSecret and https://www.beaderssecret.com
http://www.firemountaingems.com/ (good source of various colors of gimp)
http://www.artbeads.com/ (carry PowerPro)
http://stores.ebay.com/hyeonbeads
http://www.riogrande.com/
Your local beading shop or craft supplies store (like Michael's). I have seen flexible wire needles at both Michaels and Walmart.
many other sources!

Photos:
1. Layout of materials
2. Wire needle closeup
3. Gimp in its box
4. A little piece of gimp-- the length you would need to cut-- on my finger, shown for scale
5. What gimp looks like all stretched out!
 

Attachments

  • Stringing tutorial 1- layout.jpg
    Stringing tutorial 1- layout.jpg
    37.2 KB · Views: 169
  • Stringing tutorial 2- wire needle.jpg
    Stringing tutorial 2- wire needle.jpg
    17 KB · Views: 158
  • Stringing tutorial 3- Gimp in box.jpg
    Stringing tutorial 3- Gimp in box.jpg
    30.3 KB · Views: 163
  • Stringing tutorial 4- Gimp piece on finger.jpg
    Stringing tutorial 4- Gimp piece on finger.jpg
    19.1 KB · Views: 165
  • Stringing tutorial 5- gimp stretched out.jpg
    Stringing tutorial 5- gimp stretched out.jpg
    17.2 KB · Views: 156
Preparation for stringing

If restringing, first wash the pearls in warm, mildly soapy water, or wipe them with a soft damp cloth, to remove grime that may have built up near drill holes, and let them dry on a soft towel. If the drill holes seem grimy inside, thread a needle with clean white cotton thread and run it through a few times.

Cut apart the pearls carefully. I now use my Swanstrom double flush cutters for this task, but prior to this I used an X-Acto (razor) knife, craft knife or box cutter for this job, as it is both very slender and very sharp. Cut through each knot-- do not try to pull the knot through a pearl, or it will get stuck inside at the narrowest part of the drill hole.

If a knot gets stuck inside the pearl, you will have to drill it out. See this thread for discussion of pearl drilling:

Edited to add: It has been suggested to try a pin vise with a small drill bit (smaller than the drill hole) to remove stuck knots inside the drill hole.

Arrange your pearls in order on your work surface.
If you have a multicolored strand, do your arranging in the best possible natural light. I've done this by artificial light and found that I had to rearrange the pearls later, as the colors looked different in natural light.

If you are like me and sometimes bump the table, jostling the pearls out of order, you may wish to temporarily string them onto a piece of thread or beading wire or even craft wire, just to hold them in order. This has saved my sanity and my knees (crawling around to find them and then having to rearrange them isn't fun!) Or you could use one of the Sticky Mats made by Beadsmith (Rio Grande carries them.)
 
Last edited:
Expanded Instructions. Let's get started!


1. Cut a length of thread 5 times the anticipated final length of your finished strand.
Thread is cheap and you don't want to run out of thread before you reach the end of your strand!

Edit: I have updated this section to reflect a better method that eliminates an untidy trimmed knot.
2. Thread the wire needle and double the thread, making a large loose knot at the ends. (This knot does not need to be elegant as it will later be trimmed off. ) About 2-3 inches from the knot, place some sort of clip to hold the threads. I use a spring type bead stopper. We want a nice long tail that will be easy to grasp to trim off later. The clip will stop the pearls from sliding all the way down to the knot, which is there to be sure the pearls don't slide off the thread if the clip slips! Just a precaution!

String on the first 4 pearls in reverse order. [The photo shows 3 pearls but nowadays I use 4 ]. The 4th pearl you string on will then become the pearl next to the clasp. The needle should be inserted from the bottom of the pearl toward the top (the top being the end of the pearl that will be closer to the clasp.)
This matters if you have baroque or pointy pearls where you want the pearl to be oriented in a particular direction, or even if your round pearls have flaws that you want to conceal by orienting the pearl with the better side up.

3. Using your wire cutters, cut 2 pieces of gimp about 1/4" inch long (about 6mm). Better yet, cut a few extra pieces in case you mess one up. I often do. The goal is to use just enough gimp to make a small, round shaped loop. Using your wire cutters, trim the gimp so there is no snaggly end which could catch the thread.
Thread on one piece of gimp carefully, and guide it down to the pearls. It's best to push it down the thread, pinching the thread behind the gimp and pushing, slowly. This helps prevent the gimp from stretching out like a Slinky.

Pass the needle through the clasp and then back through the first pearl, drawing it slowly and carefully to avoid tangling. Guide the gimp into position with the clasp centered over the gimp. Finish tightening the loop-- your gimp should form a small firm loop that is right up against the pearl. (If you don't like the results or if the gimp has become raggedy, now would be the best time to pass the needle back through the end pearl and do it over with a new piece of gimp.)

Photos:
6. Forming an overhand knot
7. String on the gimp
8. Showing the first 4 pearls in reverse order [My photo shows 3 pearls, but these days I start off with 4 pearls instead], plus gimp (hard to see) and clasp. (I attached the thread to the tongue end of the clasp but kept the clasp fastened until I was ready to attach the ball end on the other side.) The pearl closest to the knot will be the 4th one in from the clasp; this is why you string them on in reverse order.
9. Center the clasp on the gimp before tightening the thread
10. The gimp fully tightened with the clasp attached.
 

Attachments

  • Stringing tutorial 6- forming an overhand knot.jpg
    Stringing tutorial 6- forming an overhand knot.jpg
    24.3 KB · Views: 178
  • Stringing tutorial 7- string on the gimp.jpg
    Stringing tutorial 7- string on the gimp.jpg
    19.5 KB · Views: 157
  • Stringing tutorial 8- First 3 pearls, gimp and clasp.jpg
    Stringing tutorial 8- First 3 pearls, gimp and clasp.jpg
    35.4 KB · Views: 174
  • Stringing tutorial 9- Center clasp on gimp before tightening thread.jpg
    Stringing tutorial 9- Center clasp on gimp before tightening thread.jpg
    16.6 KB · Views: 175
  • Stringing tutorial 10-  The gimp fully tightened, clasp attached.jpg
    Stringing tutorial 10- The gimp fully tightened, clasp attached.jpg
    14.7 KB · Views: 178
Last edited:
4. Holding the clasp and end pearl in your left hand and the doubled thread with the needle in your right hand, form an overhand knot with the thread between the first and second pearls. Use the fingers of your left hand to hold the loop open and guide the loop into position.

Photos:
11. Hold the clasp and the end pearl in left hand.
12. Wrap the thread that has the attached needle backwards over the fingers of your left hand to begin forming an overhand knot.
13. Overhand knot, continued: Push thread through the loop from the back to the front, using the middle finger of your right hand.
14. Overhand knot, continued: Pinch the emerging thread with your right index finger and thumb and pull the thread with the attached needle through the loop to form a loose knot.
 

Attachments

  • Stringing tutorial 11- Hold clasp and end pearl in left hand.jpg
    Stringing tutorial 11- Hold clasp and end pearl in left hand.jpg
    19.8 KB · Views: 154
  • Stringing tutorial 12- Make an overhand knot .jpg
    Stringing tutorial 12- Make an overhand knot .jpg
    21.2 KB · Views: 157
  • Stringing tutorial 13- Overhand knot- push thread through loop (from back to front) using middle.jpg
    Stringing tutorial 13- Overhand knot- push thread through loop (from back to front) using middle.jpg
    20.6 KB · Views: 148
  • Stringing tutorial 14- Overhand knot-Pinch Thread with index finger and thumb, and pull thread t.jpg
    Stringing tutorial 14- Overhand knot-Pinch Thread with index finger and thumb, and pull thread t.jpg
    17.7 KB · Views: 151
Last edited:
Edited on 8/25/15: Today I knotted a necklace with Power Pro using only an awl (no tweezers) to guide the loose knot into place before tightening it by pulling the 2 threads apart. This worked fine!
But if you want to use tweezers, keep reading.

5.
With the tweezers in your right hand, reach to the left through the loop of the overhand knot and grasp all 4 threads with the tip of the tweezers, very close to the end pearl. Slowly tighten the overhand knot evenly.

Guide the two threads of the loop that are closest to you between the tweezer and the pearl (this prevents the knot from forming far from the pearl with resulting ugly gap) and tighten the knot evenly and gently.

Withdraw the tweezers, separate the two threads that you just used to make the knot and pull them firmly apart twice, seating the knot firmly up against the first pearl. Don't worry, the PowerPro won't break!

>>>If using Pattye's Serafil or Beaders Secret, you won't need tweezers to position the knot. Just pulling the threads apart is enough to guide the knot to the correct position.

Photos:
15. Insert tweezers to the left through the loosely formed knot loop and grasp both sets of doubled threads just above the end pearl. (Photo 18b also shows reaching through the knot loop to grasp the threads.)
16. Guide the part of the knot loop that is closest to you between the tweezer tip and the pearl. This ensures the knot forms where it should without a gap.
17. Seat the knot by pulling the 2 threads firmly apart.
18. The finished knot. This is larger than knots will be later in the strand, as it goes around 4 threads.
 

Attachments

  • Stringing tutorial 15- insert tweezers to the left through knot loop and grasp both sets of doub.jpg
    Stringing tutorial 15- insert tweezers to the left through knot loop and grasp both sets of doub.jpg
    20.9 KB · Views: 159
  • Stringing tutorial 16- Guide the closest part of the knot loop between the pearl and the tweezer.jpg
    Stringing tutorial 16- Guide the closest part of the knot loop between the pearl and the tweezer.jpg
    17.5 KB · Views: 144
  • Stringing tutorial 17- Seat the knot by pulling the 2 threads firmly apart*.jpg
    Stringing tutorial 17- Seat the knot by pulling the 2 threads firmly apart*.jpg
    20.3 KB · Views: 131
  • Stringing tutorial 18-  The finished knot.jpg
    Stringing tutorial 18- The finished knot.jpg
    19.9 KB · Views: 145
Last edited:
6. Pass the needle through the 2nd pearl and make a knot, then repeat with the 3rd pearl.

7. Updated instructions:
Pass the needle through the 4th pearl but do not make a knot yet.

Trim off the tail with the original knot close to the 4th pearl, so that the cut-off tail end is concealed inside the 4th pearl.
Be careful not to cut the thread with the needle attached!
The advantage of this new method is that there is no unsightly trimmed-off knot visible, and the tail is concealed inside the 4th pearl.

8. After cutting the tail off, make a knot and pass the needle through the 5th pearl. Make a knot, string on another pearl, knot, etc. until (near the end) you have made a knot and there are still 4 pearls remaining on your beading board.
**If you are making a very long strand, see post 34 and following for an alternate way to make knots that avoids tangling an extremely long thread. This involves stringing on all the pearls at once, then making knots between them. This method can also be used for normal length strands, and is how I string now, myself. It saves time and helps eliminate tangles.


Tip: After passing the needle through a pearl and before making the knot, take a moment to run your fingers through the doubled threads, separating them all the way out to the needle. This ensures there are no tangles or kinks and that the needle isn't flipped over, and helps you to make a nicely shaped knot (and to avoid making unintentional knots in the thread along the way!)

Photos:
[18b, 19 and 20 deleted as they didn't show the new technique.]
21. Let gravity assist you to pull the pearls together and avoid gaps between the pearls.
**Note also that now there is only one set of doubled threads to knot around. The knots will be smaller now.
 

Attachments

  • Stringing tutorial 18b-- Holding the tweezers to make a knot ofter the 3rd pearl.jpg
    Stringing tutorial 18b-- Holding the tweezers to make a knot ofter the 3rd pearl.jpg
    20.5 KB · Views: 155
Last edited:
Parenthesis

At this point I will comment on how to orient the pearls as you string them, to maximize the beauty of your finished strand.

Know where the center pearl is in your strand, and mentally divide the necklace in half.

As you are stringing on pearls, turn each pearl so that its nicer-looking end is facing toward the clasp on each side of the necklace.
Why do this? The top side of each pearl will be more visible when you are wearing the strand on your neck. If you are stringing drop shaped pearls, orient the pearl so that the pointier end is facing toward the clasp on each half of the necklace. (Unless you prefer all the drops pointing in one direction.)
Also, your knots will vary slightly in size, and some pearls have slightly larger holes than others. Sometimes a smallish knot will slip into a largish hole, and this doesn't look good or separate the pearls well, so turn the pearl around to place the smaller hole next to the knot, or use a different pearl in that spot.

Edited to add: Some pearls have a definitely nicer front or back; some have flat backs. The drill hole may also not be exactly centered. Gravity will tend to make the pearl hang one way more than the other.
To encourage the pearl to hang with the nicer side facing out, string the pearl onto the thread and before knotting, hold the strand in the position you will be wearing it and give the pearl a little spin on the thread to see whether it stops with the good side facing out. If gravity is making it stop with the unattractive side facing out, slide the pearl back off the thread and put the needle into the other drill hole.

 
Last edited:
Back to our stringing!


8. (continued) You have now strung on all except the last 4 pearls.
String all 4 remaining pearls on, without making any more knots between them as yet, with their larger hole facing toward the soon-to-be-attached clasp. (This will make it easier to pass the needle back through the pearls after the clasp is on.)

9. String on the gimp, then the other end of the clasp, and go back through the end pearl as you did when you first began the strand.
The difference is that this time, you will need to snug things up so that there are no gaps when the necklace is finished. This can be a little tricky, so take your time and do it right.
As before, if you mess up the gimp, just pass the needle backwards through the end pearl and try again with a fresh piece of gimp.

Photos:
22. Gimp on the needle-- it goes on just like a bead does, but is delicate and must be handled carefully or it will stretch out.
23. Pass the thread back through the end pearl. Note that I am leaving just a very little bit of space between the last 4 pearls to allow for the back-knotting.
24. Center the clasp on the gimp.
25. The tightened gimp with the clasp attached.


Attachments

  • Stringing tutorial 22- gimp on the needle.jpg
    Stringing tutorial 22- gimp on the needle.jpg
    16.1 KB · Views: 129
  • Stringing tutorial 23- pass the thread back through the end pearl.jpg
    Stringing tutorial 23- pass the thread back through the end pearl.jpg
    33.2 KB · Views: 127
  • Stringing tutorial 24- center the clasp on the gimp.jpg
    Stringing tutorial 24- center the clasp on the gimp.jpg
    33.8 KB · Views: 151
  • Stringing tutorial 25-  The tightened gimp with the clasp.jpg
    Stringing tutorial 25- The tightened gimp with the clasp.jpg
    22.1 KB · Views: 137
Last edited:
10. After attaching the clasp, you will need to pass the thread back through the end 4 pearls one at a time and make knots between them, just as you did at the other end of the necklace.

Knots take up some space-- not much, though. I have found that the tiny bit of space -- a millimeter at most -- between the gimp and the end pearl (because you need a bit of space to maneuver the needle back through the drill hole) is enough slack to ensure that you have enough room for knots between the final 4 pearls.
And if you misjudge it and there is still a tiny gap between the 3rd and 4th pearl, just make an extra knot over the existing knot, to take up the gap. The knots are small, it's near the clasp; no one will notice.

11. To conceal the end of the thread, pass the needle through the 4th pearl but do not make a knot. Trim the thread.

Please be sure to cut only the correct thread, and not too close to the knot! (By now you are tired--or elated-- exactly when it's easiest to make mistakes. Been there, done that!)

And now you are done! Congratulations!

Photos:
26. Using fingers to spread the loop of thread as you pull it through the 3rd pearl from the end, to avoid tangling. By now the fit is snug!
27. Trimming the final knot with the Thread Zap.
28. Nice, tight knots.
29. Neck shot of the finished necklace.

The knots will loosen up very slightly as you wear the necklace so that it hangs better, but PowerPro will not loosen as much as silk will.

Thanks to my daughter for taking the photos, and to Caitlin for suggesting making a photographic tutorial.
 

Attachments

  • Stringing tutorial 26- Using fingers to spread the loop.jpg
    Stringing tutorial 26- Using fingers to spread the loop.jpg
    19.2 KB · Views: 125
  • Stringing tutorial 27- Preparing to cut the final knot.jpg
    Stringing tutorial 27- Preparing to cut the final knot.jpg
    18.3 KB · Views: 149
  • Stringing tutorial 28- Nice tight knots.jpg
    Stringing tutorial 28- Nice tight knots.jpg
    18.1 KB · Views: 141
  • Stringin tutorial 29- Neck shot of the finished necklace.jpg
    Stringin tutorial 29- Neck shot of the finished necklace.jpg
    23.7 KB · Views: 151
Last edited:
Any questions? :)

By the way, the reason I restrung this necklace is that I originally had it strung with a huge, oval, gold with diamonds clasp (not realizing how disproportionately large it would be for the 7-8mm Freshadamas), and I wanted to swap that clasp with the ball clasp that came with my color-shifting drops!

Here are the color-shifting drops (also restrung on Power Pro) with the oval clasp that used to be on the Freshadamas, and the Freshadamas with the ball clasp that used to be on the oval drops; both are improved by the swapping of clasps:
 

Attachments

  • color-shifting drops restrung with PowerPro and the oval clasp.jpg
    color-shifting drops restrung with PowerPro and the oval clasp.jpg
    24.7 KB · Views: 129
  • 7-8mm Freshadamas restrung with ball clasp.jpg
    7-8mm Freshadamas restrung with ball clasp.jpg
    24.5 KB · Views: 135
Last edited:
Thank you PearlDreams! You could make this into a book :) Very thorough and easy to follow and the photos are great!!! Congrats.
 
Thank you, ladies!

I know this is not the only way, but it's the way that seems to work best for me.
 
Thank you, Pattye! My daughter was a big help; couldn't have done it without her.
 
Back
Top