You are using an out of date browser. It may not display this or other websites correctly.
You should upgrade or use an alternative browser.
You should upgrade or use an alternative browser.
long term project: my "garden" necklace
- Thread starter claudenancy
- Start date
claudenancy
New Member
- Joined
- Jul 2, 2008
- Messages
- 246
Thanks for your kind comments Nerida and Maria.
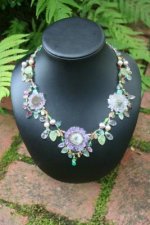
A friend who is a professional photographer took some literal garden shots with "Spring". She has promised to return to do a neck shot soon.
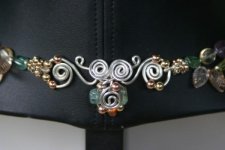
I also fabricated a clasp in Argentium with gold and rose gold beads and tried something different--two hooks attach to a central separate hidden double loop hidden by a swirl with tourmaline and gold beads. I also make my own "gimp" like cover from 30 guage Argentium--just use a big safety pin to fabricate. (Note that the divot on the left hook in the photo has been polished out--photographs are a good substitute for young eyes!
A friend who is a professional photographer took some literal garden shots with "Spring". She has promised to return to do a neck shot soon.
I also fabricated a clasp in Argentium with gold and rose gold beads and tried something different--two hooks attach to a central separate hidden double loop hidden by a swirl with tourmaline and gold beads. I also make my own "gimp" like cover from 30 guage Argentium--just use a big safety pin to fabricate. (Note that the divot on the left hook in the photo has been polished out--photographs are a good substitute for young eyes!
Attachments
la_corsetiere
Super Moderator
A gorgeous piece!
GemGeek
Pearlista
Clever lady - you're so talented! I love the rose gold beads and the handmade gimp. The necklace is quite the composition - I could easily see it in watercolors... ")
Ash
Member
Your Spring necklace looks like a spring garden in full bloom! Fabulous!
Pearl Dreams
Pearl Enthusiast
It really is spectacular! And such a great clasp. I look forward to seeing the neck shot.
Caitlin
Well-known member
That is from a true master! Congratulations from conception to finish. I'd like to see more photos, some closeups. That one belongs on the cover of a magazine.
claudenancy
New Member
- Joined
- Jul 2, 2008
- Messages
- 246
Thanks Sheri, Blaire, Ash, Pattye, and Pearl Dreams for your kind comments.
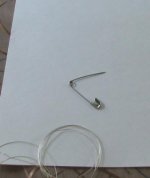
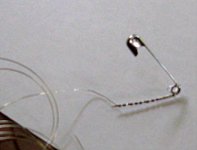
How I made the gimp:
Find an old fashioned safety pin--the kind used on baby diapers when I was a baby (that is --in the old days!).
Using 30 guage or finer dead soft round wire , wrap a bit into the loop at the bottom of the pin to secure the wire. Then coil around pin as tightly as possible. The coils will still be a little "loose" so you can push them down to sit tightly together around the pin when you have wrapped enough coils for the gimp. Allow a bit of extra length because this is not quite as flexible as purchased gimp.
Cut the coils free from the loop, and at the top. Leave no tails or only very small ones. This gimp will not tend to go into a crimp if you use one--It will sit on the top a bit. I think finer wire would work even better.
I will attach some poor photos of the pin and an example. However, I hope they are clear enough to convey this simple process.
Peace, Beth
Attachments
claudenancy
New Member
- Joined
- Jul 2, 2008
- Messages
- 246
Catlin: Thanks to you too--I always appreciate your encouragement and thoughtful comments! You do such a wonderful job moderating this forum!
Bodecia
Pearl Designer & Collector
claudenancy,
Look like an excellent way to make gimp and many other things too I suspect. Very handy to use things we have around the house. Can still buy those safety pins. Same as we had when we were kids. Guess some things have not been improved upon.
Love your necklace. It is very clever and intricate. You have put a lot of work into it and it shows.
Did you learn to drill the pieces you wanted?
Dawn
eBay Seller ID dawncee333
claudenancy
New Member
- Joined
- Jul 2, 2008
- Messages
- 246
Hi Dawn and thanks. I discovered that cross drilling these delicate stalactites is not for the faint of heart--or a beginner like me. I was able to work with a supplier with whom I had previously done business. THese must be laser drilled, and she was able to have these drilled. It does increase the cost because of possible destruction of the piece in the process.
Similar threads
- Replies
- 8
- Views
- 3K
- Replies
- 8
- Views
- 2K
- Replies
- 9
- Views
- 4K