Help with tie-bar (?) style clasp?

battah

Well-known member
Joined
Jun 22, 2013
Messages
1,432
Hi all! It's nice to be back and to see all of your fabulous creativity flowing :)

I just ordered a few of these clasps: https://www.riogrande.com/Product/Sterling-Silver-Circle-Hinged-Clasp-with-End-Caps/613547

It's my first time using a clasp with caps with tie bars. I've had no luck googling tutorials or finding instructions on how to tie them in neatly and glue/trim without leaving thread exposed. Can anyone help me out? I'm also planning to use them for kumihimo necklaces, so the tie bar might prove trickier to use in those cases. Worst case scenario I might be able to just cut the bar out and glue the braid in normally, but tying would add some nice security, I think.

Thanks!
 
Last edited:
Honestly, I have no idea. I can't see how you would have working room to tie off and trim the threads and still have it all end up neatly hidden inside the cap.

Sorry, not much help but at least you won't feel like you are the only person who doesn't get it.
 
Thanks for the reply! Hmm that's what I was afraid of. It just seems like it would be hard to get the knot nice and tight to have the cap sit flush against the pearl, but also trim the ends. With the kumihimo braid at least I can glue it in there without tying, but I obviously don't want to get glue on the pearls...
 
I've never used an end cap like this, but I have strung pearls and I make kumihimo braids using a marudai, so I'm familiar with what you are trying to do. You're going to need a very flexible needle, so perhaps a fishing line type needle threader will work for this, and that's what I'll mean by "needle."

For pearls, I think you need to treat the end cap like it was solid gimp. Thread your pearls on your thread. Thread up into the bead cap, over the bar and back out and back through the pearl. Snug up the end pearl up to the bead cap, and make a knot tight up against it. Then knot like normal. When you get to the last three pearls, don't knot them but go up into the bead cap, around the bar, back out and through the last pearl. Snug up all the pearls and make knots between the next two pearls, then bury the end through the following pearl.

For kumihimo braids, separate the end of the braid into two equal sections and bind them tightly with thread, and perhaps some glue. But leave one or two strands long, and trim the rest flush with what you are going to bury in the end cap. Thread the long strands on a needle and get it up into the bead cap and over the bar and back out. Now use a real needle to bury the threads down the center of the braid and out again so you can pull on those ends. Snug it up into the bead cap. You'll need glue I think. The two separately wrapped sections should fit on either side of the bar.

My advice is completely based on conjecture since I've never used this kind of bead cap. My advice is worth exactly what you just paid for it. ;)
 
Last edited:
I've never used an end cap like this, but I have strung pearls and I make kumihimo braids using a marudai, so I'm familiar with what you are trying to do. You're going to need a very flexible needle, so perhaps a fishing line type needle threader will work for this, and that's what I'll mean by "needle."

For pearls, I think you need to treat the end cap like it was solid gimp. Thread your pearls on your thread. Thread up into the bead cap, over the bar and back out. Snug up the end pearl up to the bead cap, and make a knot tight up against it. Then knot like normal. When you get to the last three pearls, don't knot them but go up into the bead cap, around the bar, back out and through the last pearl. Snug up all the pearls and make knots between the next two pearls, then bury the end through the following pearl.

For kumihimo braids, separate the end of the braid into two equal sections and bind them tightly with thread, and perhaps some glue. But leave one or two strands long, and trim the rest flush with what you are going to bury in the end cap. Thread the long strands on a needle and get it up into the bead cap and over the bar and back out. Now use a real needle to bury the threads down the center of the braid and out again so you can pull on those ends. Snug it up into the bead cap. You'll need glue I think. The two separately wrapped sections should fit on either side of the bar.

My advice is completely based on conjecture since I've never used this kind of bead cap. My advice is worth exactly what you just paid for it. ;)

You're brilliant! I didn't think about using it like gimp, but that makes perfect sense. This might even end up being a bit more secure than the usual glue-in clasps I've been using. I shall try it out - my clasps arrive tomorrow, and I have a nice black spinel beaded braid waiting to be finished off. I didn't leave the thread ends too terribly long, but there should be enough to work with.

BWeaves, I'd love to pick your brain sometime! I've only just started doing kumihimo but am really enjoying it. I'm using a disk at the moment but am thinking of getting a marudai. Space and storage are always an issue for me, though, so I've been hesitating on pulling the trigger.
 
OMG, you NEED a marudai and proper tama. They feel so good in your hand, and being able to use both hands when braiding gets you in a zen like rhythm that just soothes your soul.

And, they take up practically no space, as the marudai comes apart easily for flat storage.

I "get" the portability of the disks and how inexpensive they are. But working with the real tools really makes everything easier.
 
Yes! A muradai makes a huge difference. You can get into the rhythm and dance of moving the tama, instead of having those annoying slots. My muradai is not a real one (I made do with a round stool, drilled and smoothed) and it is already a lot better.
 
Ooooh I guess I need to pull the trigger! I saw some pretty ones on Etsy with nice tapered mirrors that were calling my name. I guess I need to do some measuring to figure out the height I need. Kumihimo is quickly becoming a favorite hobby, it's so relaxing. The only downside is gripping the disk, so a marudai sounds like the way to go.

Thanks for the push, ladies ;)
 
pearlescence has a great video on how to knot. She uses a tie-bar style clasp in that video!
 
Don't stress about the height. Shorter marudai that you kneel at are the traditional height. And you can always put a stool or a stack of books under it to make it higher if you want to sit in a chair. The shorter ones are easier to store, too, and you said space and storage was important.

I recommend Braider's Hand, as I think they make the best marudai and tama.

http://www.braidershand.com
 
I've used this sort quite often . It's as BW said. But I use gimp as well.
Thread on your three pearls and then the gimp then what I do is to bend the tip of the needle into a U and hook it under the tie bar ...then with my super skinny needle nose pliers I grab the needle end and slowly pull it through .
At this point I take a minute and straighten out my needle as its gone all curly. So I straighten it out , getting rid of the 'U' shape on the end and run it back through the first pearl .
This is where you need to be careful ..just pull slowly and draw the clasp to the pearl . When you get it close (make sure your thread isn't tangled ) you need to watch the gimp and try to get it over the bar and then slowly draw the thread and snug the pearl to the cap. Once it's snug tie the knot
You then knot as usual.
At the end ... Run through the last three and add gimp
Make the 'U' bend in the needle. Hook it under the bar and again, draw it carefully to the pearl. The gimp should go over the bar.
Straighten the needle and go back through the end pearl
It's important to get your tension right... Snug the pearls up so that it's a close fit when you go back through that end pearl
Finish knotting as usual.

TIP
I always drill out my end three pearls so the hole is wider for the extra thread.
This clasp works best if the pearl it's butting up to is round on that end. It makes a better look if it's a very close fit .. So something 8 mm and round /ish. I always choose the clasp pearls first to make sure they fit it.
Sometimes the tie bar is poorly placed. I spoke to a manufacturer in HK about it as his company placed the bars too close to the end. This causes the pearl to but up to the Tie bar and leaves a gap ..which really annoys me! He said it's done that way cause it's easier than trying to fit it deeper. So ..check the clasp ..you might need to try a few till you get a good model.

Hope you could follow this :). Sorry about random commas ..I'm on iPad in car ( no I'm not driving lol ) and my fat fingers randomly hoy the period and comma
 
I like Katbran's method, but I would swap out needles and save the hooked needle just for going through the tie bar. Then change to a straight needle for going back through the pearls. That would save wear and tear on straightening and curling the needle. Obviously, if you've got the needle on a doubled thread with no loose end, my method won't work and Katbran's will work.
 
This is really helpful information...I generally use Pattye's big eye needles and the needle nose pliers to grasp the end. I find that needle flexible enough that I don't need to bend it into a U shape first. But I've only worked with this style clasp a couple of times. I have used something similar that has very small hole on the cap...that makes it much easier to work since you go up on one pass, pull through the hole, then reinsert into the hole and come down on the other side of the tie bar. I have restrung several strands that have this style clasp.
 
Awesome, thanks for the great info, ladies! BWeaves, I was just coming to ask where you got your marudai - I was looking on Etsy but not seeing exactly what I want.

My clasps are out for delivery today, so I should be able to fiddle with attaching them tonight or tomorrow. Hoping to have a happy update for you by the weekend! Thanks again for the great info.
 
I've always used a doubled thread hence the need to bend the needle...tho I have to say it holds up really well and lasts through several necklaces...the needles I've used are the long fine ones that are fused at each end for about a cm. They are a bit stiff. I've not yet tried Pattye's needles on this sort of clasp but am keen to try them out if it avoids the bending. ( I 've got some in a bag waiting for me to open them..I was using up my old ones)

As Pattye has noted..you sometimes need to get creative with the tie bars...I've had them with two crossed inside the cup and the top one sits too far out so the pearl can't snug up at all...so I've clipped that one out and tied off to the lower one.

And I use the gimp as when you look at the tie bar some of them can be a bit rough so as Pattye noted it protects the thread.

But...do try out your potential end pearls with the clasp to find one that gives a nice fit..makes for a nice finish.
 
20160608_085309-768x1024.jpg

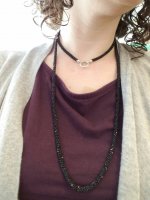
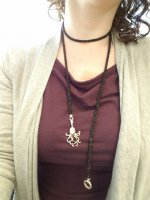
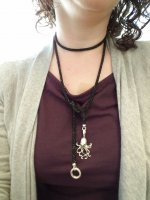
Thanks for all the help, ladies! The clasp ended up having a large enough cup at each end that I was able to just glue my braids in. I love how it turned out! This type of clasp will end up being in heavy rotation for me, I think - the center ring has a spring hinge, so pendants can be hung on it. Love it.
 
A few more pics of ways to wear this type of clasp on a long necklace.

20160608_091240-768x1024.jpg
20160608_091254-768x1024.jpg
 
Back
Top