Working with Keshi

B

boo

Guest
While it certainly doesn't compare to Steve's pearls, I thought folks might be interested to see this: keshi from Kamoka (Josh) via DruzyDesign. (Since I seem to have a habit of taking my photos indoors at night, the photo once again doesn't do them justice...)
 

Attachments

  • TkeshiIMG_1985.jpg
    TkeshiIMG_1985.jpg
    119.4 KB · Views: 32
Boo, it's great. To me the key point is the relative significance of all-nacre pearls on this forum, be they naturals, untreated FW exotics or keshi/"keshi".
 
keshi

keshi

Hi Boo,
Do you knot between the keshi and silver nuggets? Thanks.
 
Hanaleimom said:
Hi Boo,
Do you knot between the keshi and silver nuggets? Thanks.

I actually tried knotting these pearls, but for some odd reason the size of the drill holes varied widely from pearl to pearl. If I used a thin enough thread to get through the pearls with small holes, the pearls with big holes swallowed the knots. In retrospect I suppose I could have tried double knotting, but instead I went the pattye route with these and used wire with tornado crimps.
 
Boo, they're beautiful and they look so good against your skin tone. Thanks for posting the photo! :cool:
 
Wire with (tornado) crimps is just what I do when I have beads with various sized holes. I used to use smaller crimps, but I think Pattye is onto somethiing with those tornados.

The only problem I ever have with wire is that the beads/pearls settle on them over time. Then a bit of wire is exposed at the top. That can be overcome by technique, I imagine-though I haven't solved it 100% yet......
 
This is a bit divergent from the topic, except as it relates to keishi and stringing them.

Per Caitlin,
The only problem I ever have with wire is that the beads/pearls settle on them over time.

Yes, they are so frustrating! Those belly-drilled keishi especially. This probably should go on another thread. They have to be seated very carefully, checking for spaces between. I am working on 2 strands now, not expensive and very pretty, but sooooo time consuming. I will take some photos and start a thread under "Lowly Beaders" just about working with keishi.

Pattye
so many pearls, so little time
 
Stringing Keishi (Keshi)

Stringing Keishi (Keshi)

Hi Everyone,

Appreciate your tips for stringing keishi. Here are a couple of my latest projects, which have been very frustrating. They tend to "go crooked" but I am being persistent, because I think they are really pretty and could look interesting and different. The top ones are dyed, the middle a silverly natural color and bottom ones are newest Kamoka (woo-hoo) which I think, being thicker and 5-7mm (from Sarah at Kojima Pearl) will be much easier to work with.
keishi .jpg

I have tried different patterns of beads and spacers. then I have to try to "seat" them so they are closest together so that no wire shows. And so they won't settle later exposing the wire by the clasp. But to give a little flexibility they seem to need some kind of spacer, primarily on the very thin wider ones. appreciate your comments and suggestions.

Pattye
so many pearls, so little time
 
Center-drilled keishi are a little difficult to string. The beauty is on the flat side. When stacked, they look at bit like corn flakes and all the iridesence is hidden. If top-drilled or side-drilled keishi aren't an option, try reworking your design so it's not so linear, more flowery perhaps. Incorporate a stringing material into the design so you don't have to hide it. This could be a good application for Griffin cord.
 
When that has happened to me, I have been able to cheat by using a crimp bead cover over the exposed wire. One on either side of the clasp will camouflage about 4mm of exposed wire.

And I would be fine with moving all of my posts to a keshi topic on the Lowly Beader forum - I didn't mean to hijack this one. :eek:
 
Ok I will move some of these posts to Lowly beaders under the title of Working with Keshi.

Pattye. I hope you can photograph the process of fitting the beads so they won't settle- like a dropped on keshi with no adjustment and then a fitted keshi.

I admire your care. I noticed a pearl store at the JOGS show that had a thousand pearl necklaces on a wall. Hung on wire- and every one had slid to reveal the wire at the clasp.
 
Before you move this Caitlin, can I add something? First, Boo. Love the keshi and they should never, ever be knotted. Unless you want to do random symmetry. Other than that, they are beautiful as they are.

Exposed wire: I never leave enough room for a crimp cover so if I put one on, then the strand is too tight, yada yada. I do use a jump ring technique which covers the crimp and the wire and you can use as many or as little rings as you like to solve the problem. I'm sure I've got a pic of it somewhere on this forum.
 
Fitting the Keishi--

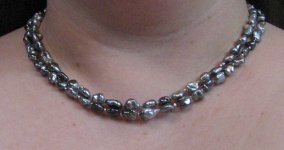
So far this has been the process--string an inch or so, hold danging up to the light (north-south) and look for spaces where the wire shows. rotate the keishi pearls from the bottom continuing along the wire to see if I can get a tight fit, no wire showing. Check to make sure no keishi are shaped such that it makes a bend in the necklace when pushed tight against each other, restring as necessary, (heavy sigh).

Knotty, the keishi I have are very pretty and iridescent on the edges also, or I never would have bought them. I have seen some that have black pits there, but would not use them, of course.

I feel the larger keishi can look fine with spacers or knotted, much is personal preference, and if we are doing it ourselves!

On these I have started stringing from the center out--actually I often do that, because I choose the elements but don't entirely plan ahead of time. I string right onto the spool, then when I have the design and length I like, cut enough wire for the other side and work out from the center on the 2nd side. Yes, sometimes it wastes a little wire, but it works for me. Hopefully as I get better at planning, I can be more efficient with the wire.

Pattye
so many pearls, so little time
 
Fitting the Keishi--

On these I have started stringing from the center out--actually I often do that, because I choose the elements but don't entirely plan ahead of time. I string right onto the spool, then when I have the design and length I like, cut enough wire for the other side and work out from the center on the 2nd side. Yes, sometimes it wastes a little wire, but it works for me. Hopefully as I get better at planning, I can be more efficient with the wire.

Pattye
so many pearls, so little time

Funny... this is exactly how I work. Even pieces that are eventually done on silver wire - first I string them working from the center of the necklace. Placing pearls / beads on the board helps, but only stringing them shows me how they will look once thread is passed through. As you all know - not all holes are drilled the same way, not all of them are centered, especially in stones.
Once my necklace is strung on temporary wire ( by now I have quite few different length of wire that are little kinked and good only for "try-outs") I start on the "real thing" going properly from one side to the other.
Your keishies project are beautiful. I did not find other method that "tryouts -errors and corrections". Only thing that helps me - once I strung them temporarily, when transferring on the thread ( usually Power pro for projects like this) I do knot... in some places - places where knots can't be seen. They do give me more even distribution. Sometimes I add in-between the keishies a tiny seed pearl to make those on two sides "sit" better. As you said - long process, but quite rewarding once you get it right !!
 
Funny... this is exactly how I work. Even pieces that are eventually done on silver wire - first I string them working from the center of the necklace. Placing pearls / beads on the board helps, but only stringing them shows me how they will look once thread is passed through. As you all know - not all holes are drilled the same way, not all of them are centered, especially in stones.
Once my necklace is strung on temporary wire ( by now I have quite few different length of wire that are little kinked and good only for "try-outs") I start on the "real thing" going properly from one side to the other.


Well I never - this is exactly how I work, too. Even though I only string the finished pieces on silk I still do everything the same way as Pattye and Imanit, using wire to string temporary designs.
 
Back
Top